
To open a new SQL Tag Config sheet, click the Admin Tools icon, then select SQL Calc Tag Writer from the drop-down gallery. Adminsitrative privileges are required to edit this sheet because it allows modification of data in the SQL database.
This sheet creates new SQL tags and can write data to these tags in the SQL database. Click Show Detail to see more fields that can be specified.
To add a new or existing tag to the SQL calcs insert sheet,
1. Select a blank row underneath the header

2. Type a source and tag name in the Source and Name columns.
3. Skip to step 6 if the tag has been previously configured, or if the defaults are acceptable (numeric tag, blank description, no units, plot from 0-100, continuous interpolation, and continuous draw mode). Otherwise, click Show Detail. Additional columns will appear on the sheet.

4. Select the type of values that the tag will store in the Type column: “TEXT” or “NUMERIC”.
5. Fill in the other columns according to how the tag should be displayed in the tag browser / trends, or leave them blank to accept the defaults.
6. Repeat the previous steps for all tags that need to be added. When finished entering information, click Configure Tags. If Show Detail was previously clicked, click it again to hide the extra columns.
A source must be specified for every tag, or for just the first tag if they all have the same source. Any name can be chosen, but to view the tags in PARCview, the source must also be configured as a SQLCalc source in PARCview. This is a SQL.NET type source with “SQLCalc” as the Server, which will use the pre-built SQLCalc Tag Template.
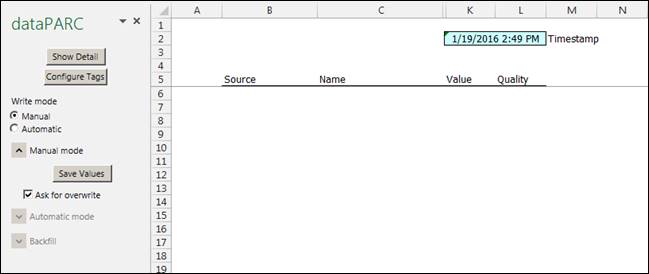
Tag values can be recorded manually or automatically:
Manual Mode
1. Under Write mode, select Manual, if it is not already selected.
2. Enter a time at which to insert values.
3. Tick the Ask for overwrite checkbox to be notified if values already exist for the tags at this time.
4. Enter values for all tags in the Value column. If any values should be recorded as bad quality, enter ‘BAD’ in the Quality column next to the value.
5. Once all values are entered, click Save Values.
If a tag is configured as numeric, only numeric values will be accepted. The values may be manually entered or formula based.
Automatic Mode
1. Under Write mode, select Automatic.
2. Enter an interval in minutes for values to be added, in the Minutes between cycles box.
3. Ensure that the Value column has formulas that will produce the correct tag value at the time given by the Timestamp range. If some tags should have bad quality under some circumstances, enter a formula in the Quality column which evaluates to “GOOD” or “BAD”, as appropriate.
4. To start cycling, click Start. To stop cycling, click Start again. When the worksheet stops cycling, it will display any errors it encountered while cycling.
To evaluate and enter values from past intervals, enter a start and end time and click Backfill. The backfill will step forward at the same interval specified for cycling. If cycling is active when the backfill starts, it will continue once the backfill ends, but values during the backfill will not automatically be entered. Before using backfill, ensure that all tag value formulas respond to changes in Timestamp.